01 Dec 2014 Amazon Elastic Load Balancer
Elastic Load Balancer is a service provided by Amazon Web Services. ELB handles all incoming traffic, distributes all requests across multiple EC2 instances that actually fulfill the requests, fetches the responses, and sends it back to the client.
There are many load balancing algorithms supported by Amazon ELB. By default the load balancer forwards the requests to the EC2 instances using the Round Robin algorithm. However the load balancer can be configured to use sticky session feature which ensures that all client’s requests during the session will be served by the same instance, i.e. the load balancer binds the client’s session to a specific EC2 instance.
Amazon ELB cannot be used to cache responses received from the application servers, But it can be used with Amazon CloudFront. Using CloudFront to deliver static and dynamic content improves latency because the page is cached at different edge locations around the world. Also, it can be configured to work with Amazon auto-scaling. So that any new instance launched by Amazon auto-scaling is added to the ELB. We will talk about this service later.
Application servers ( Back-end servers ) are deployed on amazon Elastic Compute Cloud (EC2). They can be assigned to different availability zones. Availability zones are isolated locations within same region. we can think about availability zone as a data center. This makes the system fault tolerant, because in case massive failure occurred in one zone, and the servers are down, this doesn’t affect the servers in the other zone.
ELB can distribute load across EC2 instances in a single AZ or different AZ within same region, but cannot distribute traffic across regions.
To create a basic Elastic Load Balancer using amazon console:
In EC2 dashboard. under network and security section, select load balancer.
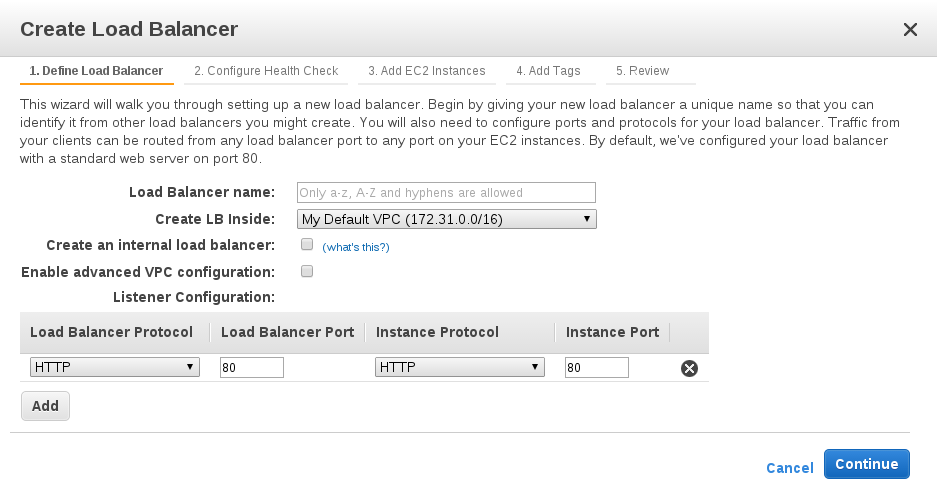
First step is to define load balancer:
Specifying the name of the ELB instance. It must be unique within the set of load balancer.
Choosing a VPC (virtual private cloud ) to launch the ELB within it . the load balancer must be created within the same VPC as the EC2 instances.
Selecting create an internal load balancer makes the load balancer to be private. In this case a DNS name will be created and contain the private ip address of the load balancer which means that the ELB isn’t exposed to the internet. Otherwise the DNS name will be created with the public ip address (internet-facing).
The default configuration creates load balancer for HTTP service which listens on port 80 and distributes traffic to port 80 on the instances.
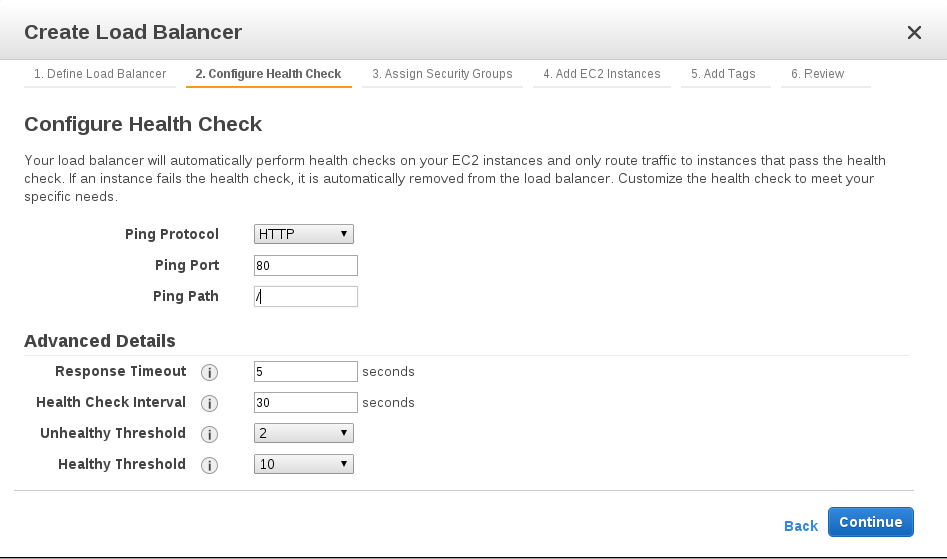
The next step is to configure the health check:
The elastic load balancer always check the health of each EC2 instance connected to it. If the elastic load balancer find an unhealthy instance, it will stop sending traffic to this instance and forward the traffic to the other healthy instances.
Select the ping protocol and the ping port. The default protocol is HTTP and the default port is 80. ELB uses ping port to send health check requests to EC2 Instances. If it is required to change the ping port, the EC2 instances must be configured to accept incoming traffic on this port specified for the health check.
The ELB sends heath check queries to the path specified in ping path. In this case the ping path / means the ELB will send health check queries to the default home page of the HTTP server.
Advanced details
ELB will send health check request every 30 seconds ( Health check interval ) and waits 5 seconds to receive a response from EC2 instance ( Response timeout ). After 2 consecutive health check failures ELB will mark the EC2 as unhealthy ( Unhealthy threshold ). After 10 consecutive health check successes ELB will mark the EC2 instance as healthy ( Healthy threshold ).
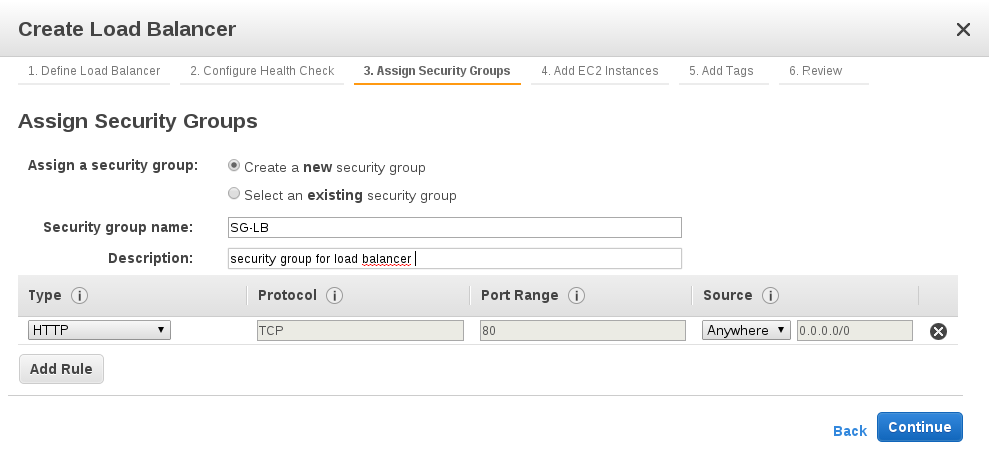
Assign a security group to the ELB. Add rules to each security group that allow traffic to or from its associated ELB.
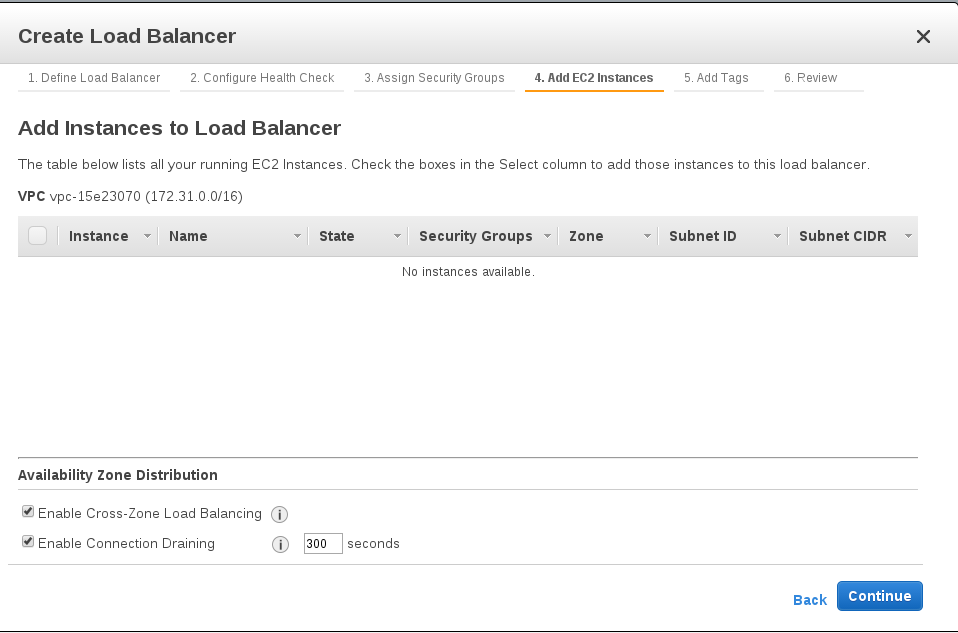
Adding the EC2 instances to the load balancer. In case the EC2 instances are assigned to different availability zones and the traffic is distributed among them. The ELB must points to multiple availability zones. This can be done by checking “enable cross zone load balancing” option.
Enable connection draining : By enabling this option load balancer continues to send traffic associated with existing sessions to that instance after it has been selected for termination but no new sessions are assigned to this instance. Until the number of active sessions reach zero or the Connection Draining timeout is reached and the instance is terminated.
Finally add tags to the instance and review the configuration then launch it.


